Creating a Pet Portrait
A belated Happy Easter to you all! It’s been a busy couple of weeks, and I haven’t had a chance to sit down and write!
I hope you all had a wonderful Easter and managed to stay safe and enjoy the fantastic weather. My Easter started exceptionally, with the arrival of my beautiful nephew Remi on Good Friday. What was even more special, was that he was born on the same day as my Dad’s birthday. Sadly, my Dad passed away nearly two and a half years ago, so to have his first Grandchild born on the same day as his birthday is just remarkable. However, with the lockdown as it is, we have had to meet virtually which is just not the same as cuddling and smelling a newborn baby! Our meeting will have to wait until lockdown is over! Fingers crossed that this will be reasonably soon!
The pups are 5 weeks old!!! I can’t believe how fast the time has gone! With the glorious weather, we’ve been able to put them outside in a run, which has been great. Despite the mess we seem to constantly be clearing up, they are an absolute delight and a wonderfully positive distraction during this current situation.

You may have seen on my social media that I recently completed a portrait of my Bee. This is the second portrait I have done of her. The first portrait I drew of Bee was the first portrait I ever did in coloured pencil. I was happy with it but I felt I could have strengthened my use of colour, so I decided to draw her again. She is a difficult subject to draw due to her colouring - there are so many colours in her and ensuring that I get them all true to life is a challenge.

All the colours I used for Bee’s portrait.
In this blog, I’m going to guide you through the process of how I complete a pet portrait. Please forgive the bad photography, the light in my office is not forgiving and I am currently sorting out a new photographing area.
The start - drawing my outline. Over the last year or so, I’ve constantly had a fight with myself about how I achieve the initial outline of a pet portrait. For years, I would use the grid method, where I would draw a grid over the image, a matching grid on my page and then copy the outline onto it. Pros and cons with this method – I always felt like the whole drawing was totally my own, but it would take so much time to get it right. Only one section needed to be slightly out of place and the whole drawing would look incorrect. Not what you want when you are trying to draw a realistic life-like portrait. You then also have to rub out the grid, not always easy if you accidently pressed too hard. I had often thought about tracing over the image, but just couldn’t bring myself to do it as I thought it was deemed as cheating. It was only when a fellow artist suggested tracing the outline over a lightbox that I re-considered this option. I wanted to spend my time bringing a portrait to life by adding colour, texture and shading. The less time I spent on just the outline, the better. So I plucked up the courage and purchased a lightbox and now I do trace over the outline of the image. It still doesn’t sit 100% comfortably with me, but with my business head on, it makes a lot more sense to do it this way. I’m still always coming up with excuses like ‘the outline is just the bare bones of the portrait’ and ‘it still takes an awful lot of work and skill to fill that outline in’! Below is the image of Bee right at the start – I have started with her eye, but you can see how faint and simple the outline is behind. I’ve also started a white cat on grey pastelmat, here is the initial outline before anything else is added.


I tend to start filling in my pet portraits with the eyes. I always feel this is a good base to then build around. I usually put quite a bit of detail on the eyes, although never finish them completely at this stage. Once I have a good rich colour here, I start to fan out from them, building up colour over the rest of the image. With Bee, I added colour between the eyes before starting on her left ear. I then progressed to the right ear before shading a base layer over the rest of the image. I like to add colour to the whole image before going back to the start and building up on that colour, as then I know I’ve got every light and dark area on her fur in the right position. Then I can add the texture strokes and darken the colours. Otherwise I fear that I would go too dark in one area and it is not quite in the right place which would make it more difficult for me to move.


I add more and more colour to various aspects of Bee, her ears, her cheeks, the start of her leather collar and then I start on her muzzle. Noses are always a joyous challenge to draw – there is often so much detail. Once I have a good amount of colour and texture over the whole portrait, I tend to go over the whole drawing again. Adding more colour, creating more fur strokes, erasing areas which need to be lighter, scraping away pencil to create texture and if I need to, applying the Coloured Pencil Touch Up Texture with a very fine brush to create highlights.

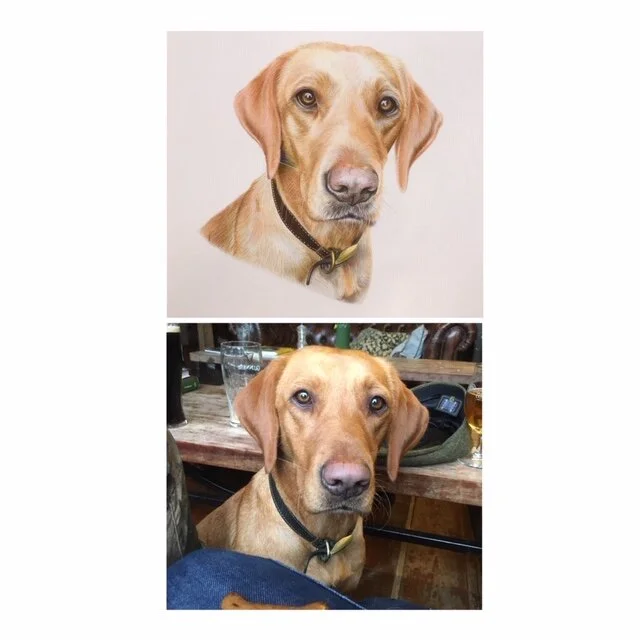
Bee
I was pleased when I got to the end of Bee’s portrait and I was thrilled with the result. I have managed to capture her unique expression and personality. Creating a drawing from a photograph is a never-ending process. There will always be more colour or texture to add or take away but at the end of the day, it is a drawing, so it will only ever be a representation of the original image. I usually get to a place where I am happy with the likeness to the original and displays enough soul and character for the owner to instantly know it is their pet.
I hope you have enjoyed reading how I create a pet portrait. Please do not hesitate to get in touch if you would like to commission a portrait of your pet or of someone else’s as they do make wonderful and unique presents!